Wednesday, May 29, 2013

INDN 252: Creating Something Solid..........works.

So, now that I have successful scans of my face's topography, It's time to start getting some work done in Solidworks. After the scan was complete, it allowed me to take the curve of the face I traced into Solidworks, meaning I could simplify it to make designing a lot easier.

The curvature that I chose to work with was a circle of radius 84.5mm. I then translated this arc around several times, allowing myself guidelines that would serve as the outer boundaries of my work.


I've decided to include all the Solidworks work that I've done into one blog post, as this will KEEP IT SIMPLE. And save anyone who reads this (is there anyone out there?) scrolling backwards through multiple blog posts to find the content.

After tracing out my base lines, I then started with an extruded curve, and the started to chop it up. I altered my plan for the pieces of this model a bit after learning that we were able to use the Connex Multi-Material printer, which allows us to use different materials in the same printer, as well as blend the materials (rubber and hard resin) to get different material properties.

Therefore I'm doing most of my designing directly in an assembly, which will allow me to make sure everything fits perfectly. This form below forms the base hard layer of the skin level part. This holds more purification mechanics that will then feed into small ducts that will feed into the bloodstream. It also holds the base section for the filter.

The notches in the model above are for where the rubbery parts in this segment will fit. This is where the different materials will fuse together, creating a unified whole.

The main round section below is where the filter will connect into the form. The way I'm getting this bit to work is with a push-in-then-turn-to-lock system. The filter will have small extrusions that snake into the defined paths, allowing the filter to easily slide in and out of the hole, while also maintaining a tight seal.

The rubber in the base of the circular section will have a small rubber disc in it that will provide the resistance for the filter to push against. The multi-level locking system should ensure that the whole thing doesn't fall apart. Hopefully, at least! The small circular notches are aesthetic elements, where we could imagine the whole piece would be fused and connected.

The blue sections in the image above show the rubber segments of the part, which will serves the connection points for the outer section. The reason why I wanted to disconnect the forms rather than having one whole fused piece was to allow the user to easily take the piece off for sleeping or for other moments, as a sticking out segment might not be most conducive to that.

Another important element of being able to remove the sections would be that it would allow the user to customise the different sections with different choices for their personal preference.

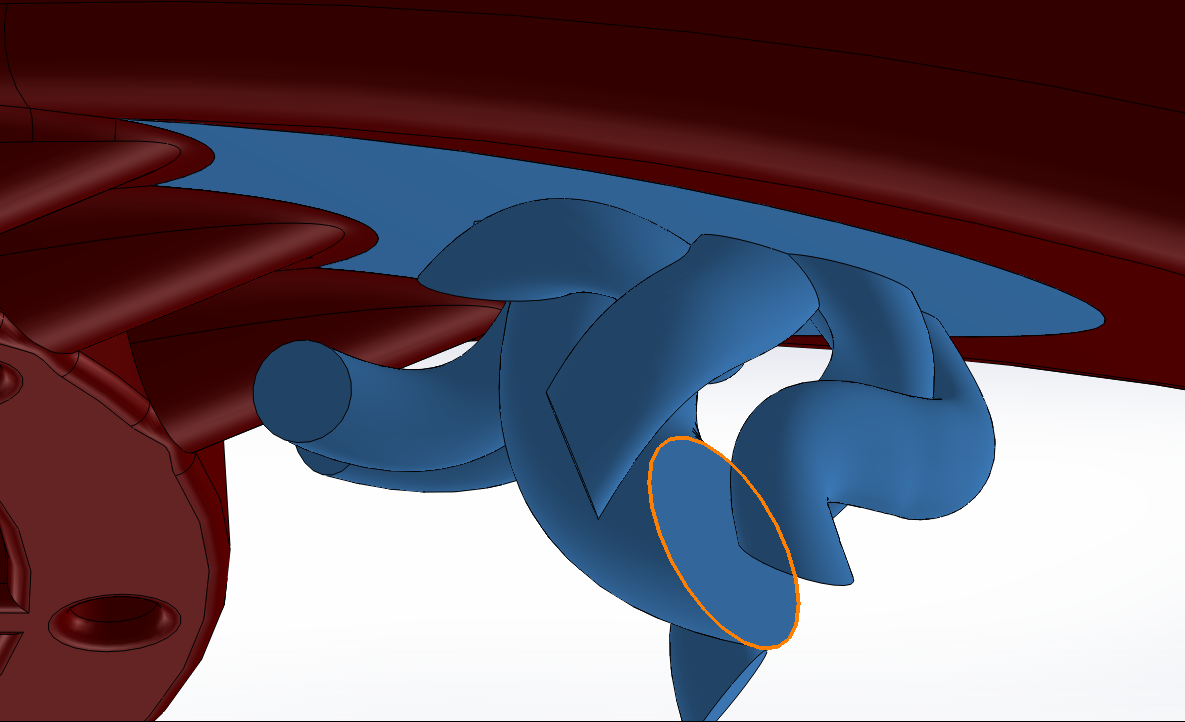
The tentacle-like section serves as the interfacing element. When grafted to the face, these connection points (with valved tips) would be attached to the bloodstream, to serve two purposes. The primary function would be to feed the siphoned water from the creature (as yet un-named) into the bloodstream, while the secondary function would be to provide an electrical conduit for the creature to receive heat-based energy.

The filter is one of the most important sections of the whole project. While being the main removable filter, it also serves as a connection pin to hold the pieces together and stop them falling out. Ideally, this system should work perfectly. The emblazoned form on the top is the company logo. That's something I'll be looking into heavily for the next part of the project, namely the accompanying booklet with the supporting imagery.

Branding will definitely be a big part of that.

Another element I've built in heavily in this is the idea of customisation and choice. I think if there was a situation which required you to have a machined form on your face, you should at least be given choices for how it could look. So therefore all the individual components have the model number stamped onto them, so that a user could refer to a catalogue that would let them chose different variants of the same form.

Maybe the choices could involve anything from material to colour to form.

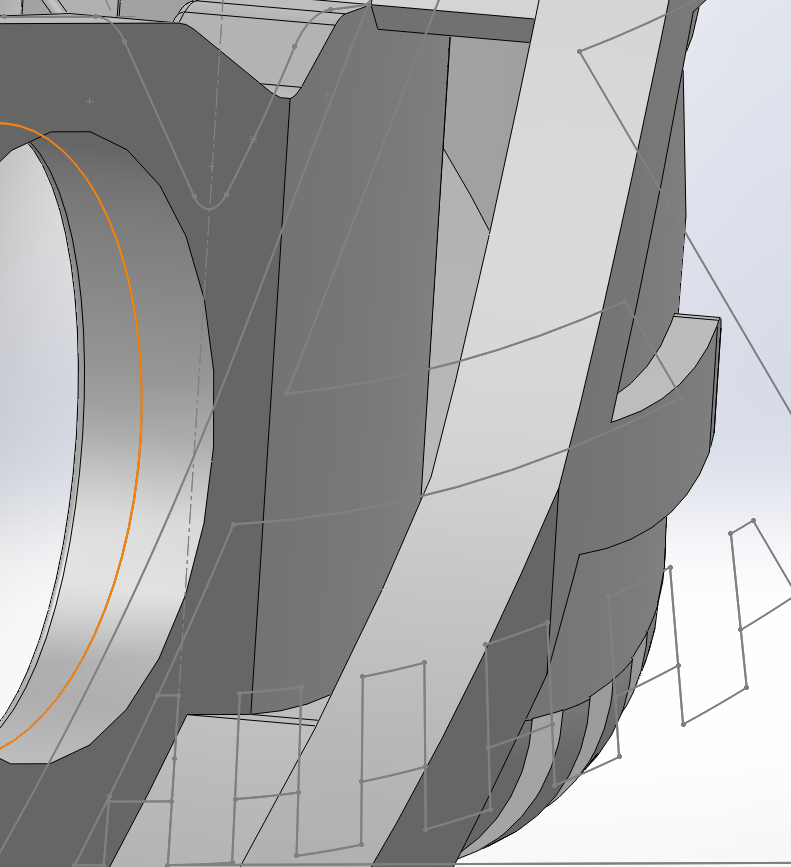
This shows the connection of the filter into the base layer of the piece. The notches are aesthetic again, so as to match the notches above in the logo. Ideally, the fit should be tight, but not so tight that it isn't easy to move. The gaps form part of the filtration system, and denote the points where the muck from the air could be washed out.

The section that I added next was the point where the skin would merge with the implanted device. The area around the hard (red) section of the base plate would in an ideal world be made of some sort of a carbon nano-weave scaffolding, encouraging the natural skin to grow on it, so that the overall form would be less apparent.

My next step was to design the removable portion of the whole form. It had to allow the alien life form to sit inside it comfortably, while having the connections necessary to socket into the base plate. For the actual form, I again drew heavily from the futuristic video game architecture. Harsh lines, however these lines were still dictated by overall curve I built into the form of the face. The curve is shaped both vertically and horizontally, making it nicely 3-dimensional while still being a relatively simple and linear one.

Another form that I used for the outer shell is the repetition of specific parts. The notched element is inspired by small-scale water filters, and it also provides a rhythm to the edging of the form. This notching would in an ideal world have a sort of grating on it, possibly a grating that was at a nano-scale. In a way, the intake vents of this device would be the first level sieve for air particles.

Continuing on the tradition of naming the different sections of the forms with serial numbers, this piece again has a different number. Here I also made sure that this section could smoothly sit on top of the base plate, fitting into all the right spots. The filter here has much more space as this section has to sit atop of the small curved extensions from the baseplate.

The socketing points are extruded from the back of this piece, and are actually extruded from a small recess that the other segments get to slide into. In the image above you can also see the trace outlines of the rubber forms that will be the socketing point. The points were designed in tandem, so they should fit perfectly. I just really hope I haven't made them too thin!

The inner section provided a bit of a challenge. This part has to slide easily in and out of the outer shell, as well as provide a bed for the alien life form. The circular recess for the filter to slide into also in this case gets to act as a point of grasping so that the release can be facilitated. Sliding the section out and having it actually come out smoothly is the one part I'm a bit worried about, as that's something I sadly haven't gotten around to testing.

I wanted the alien species to not really be discernible as a creature, but more to be like a moss or fungus of sorts. All it requires are the basic amenities for life, and it will do it's job. Cool. I went for a rhythmic sucker-like aesthetic on its surface. It'll be printed out in rubber, so hopefully that form will still work out well and actually look good. Time will tell.

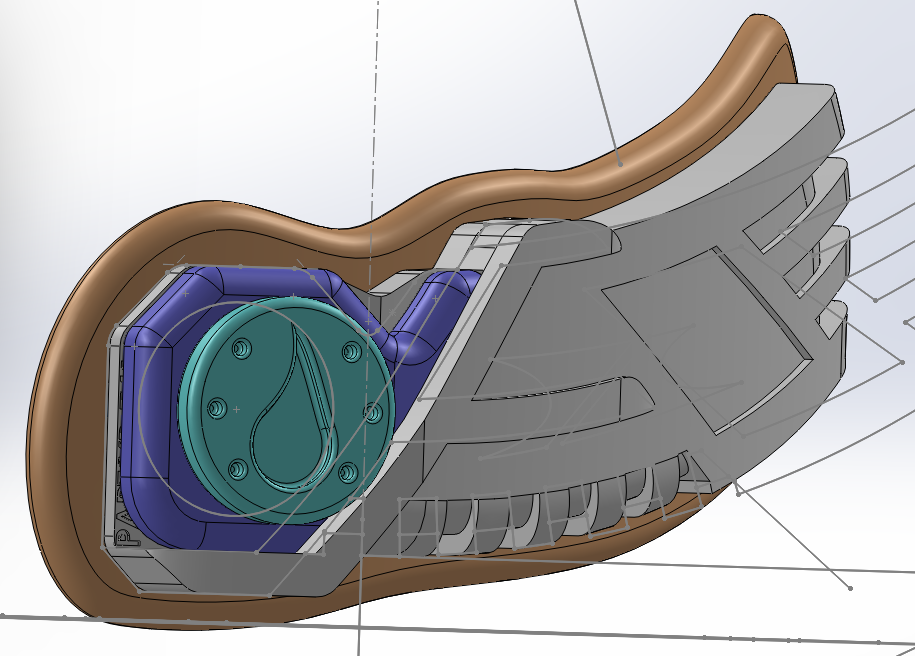
The form is complete! Five separable sections, each with their own purpose. Overall I think I conveyed the aesthetic I want to achieve. The outer shell sits against the base plate nicely , and I made an effort to have the edges of the form slope to meet the skin, so that at the right of the form the interface point is less of a harsh difference.

The filter provides a nice full stop to the design. It is the keystone in this form. It joins all the pieces and makes sure that none of them come out. Very important stuff.

The back section of the model is where the almost sinister life-bringing tentacle forms connect into and interface with the body. They provide an electrical/heat conduit, as well as straw type valve constructs for the water to be emitted into the body. Constant hydration is key, yo!

Sunday, May 26, 2013

INDN 211: Table Talkers And Fancy Pictures

Wow, so it's all done. I'm actually really, really happy with this project. It's not been one of those thing you do at the last minute. It's been something that's been in the work for weeks. I've had the components lying around for the past few days, and putting them all together has been the last little bit to do.

But I'm so pleased with the outcome. And the photos, after a bit of work, turned out just the way I wanted them! 

For the photos, I really wanted to convey a more antique aesthetic. The dark stained wood makes the set feel old, a consideration I wanted to target at the older market. The lighting that's been put in the photo studio recently really makes the pieces feel like a museum piece...which is pretty exciting.

As well as the photos of the product, we also needed to make a poster, detailing the project.

I'll let the photos do the talking now.

1: Collective Apparatus

2: Assembled Apparatus

3: Focused Gripping

4: Minimal Holding Effort

5: Considered Application

Saturday, May 25, 2013

INDN 252: Creepy Scans...

The easiest way to start working on the form that I want to achieve is to get a 3D model of my face. Now, there are several ways I can do this. The first way would be to scan my face with a Microsoft Kinect, which we have access to. Sadly I didn't get a chance to use that. It has the ability to create a brilliantly accurate topgraphical map of 3d spaces. Very cool.

Another option would be to use alginate to make an impression of my face. Then I could make a plaster mould and measure that cast. This is another workable option

But in stead, I decided to do something even creepier. I decided in stead to use the program 123D Catch made by Autodesk. The way that it functions is it gets you to take multiple photos all the way around something, and then it composes them into a 3D model. Very cool, but it looks very creepy.

Translating this kind of form into something workable is important, because in its current form, it isn't that much use to me. So, my first port of call was to convert the form into a wireframe model. This form I could then use as a baseline model to make up a basic curve to use as my shape for the modelling to take place on.

After altering the format of the file, I could then use that form to generate a standard curve. This standard curve I can then use to initiate the next phase of the design. I can then use those curves in the Solidworks models. Up next, I get CRAZY.

Friday, May 24, 2013

INDN 252: ...Which Evolves Into Something More...

Now that I've got a plan, I can start ironing out the kinks in the project. One of the things that I've decided to do on the project is slightly re-structure it. Rather than having a device that is purely technological, I was thinking, why not make a device that, at it's heart, has a creature. Maybe the creature isn't very creature-like, but it's definitely got a purpose.

Image acquired from: sportdiver.com

I was thinking about a symbiotic relationship. The creature could leach energy off you, and in return, it siphons the water out of the air for you. Both benefit, and it gets a safe home and care. The idea of this creature reminded me a lot of the little fish that swim with the bigger fish. It grants them safety, while they keep it clean and free of parasites.

This then made me redesign my actual object. Since I wanted it to be removable, it had to be able to be socketed in and out. This could be done by a few connection points working in various ways. The filter is the primary lock, while the secondary points merely socket the device. The filter also serves as a connection point for the fluids, acting as the gateway for the fluids to leave the top device and be further filtered before being fed into the bloodstream.

Meanwhile, the actual arrangement of the form would as a result change slightly. My thoughts are that the creature would sit on a sort of base layer, allowing it to be removed from its hull. Perhaps at night it has to be taken out and laid in a small tray of mud or something. Something strange.

This arrangement then allows the separate pieces to be removed and split apart. Hopefully it'll work out! On to Solidworks next!

Wednesday, May 22, 2013

INDN 252: ...Which Becomes A Flame...

The actual shape of the piece would be decided by the underlying structure of the face, as well as my discretion. Heh. The part of the face that I'm targeting the design for is the cheekbones. The bones could provide structure for the constructs, as well as the curve of the face proving a natural form for me to work on.


The blue segments define the section of the face I'm designing for. Just below the eye, the face curves in a relatively linear fashion on the cheekbone. This is my canvas for my work. This is my location, my site, as it were.


At first I started off with something very random and chaotic, just to see what sort of forms would work well for that part of the face. The form could be quite an organic, slim form, or it could take a much more angular, chunky form, juxtaposing against the body, which could be an interesting feature as a whole.


The angular forms could be inspired by the architectural precedent I used in the first project, and could build on the idea of melding human anatomy with with cyborg elements.

Image acquired from: fuckyesvideogamearchitecture.tumblr.com

The angular edges build this idea of something that is a spawn of the future. Futuristic technology that aids. In a certain way the technology is reminiscent of a hospital, maybe looking at harsh whites as the primary colour. Then it could possibly utilise blacks as the secondary.

The form could incorporate elements of the body's natural curvature, and use that as the primary curve (we wouldn't want to fight the natural form too much!), and then build on it from there. Perhaps the natural swing of the face could be a vertical as well as a depth element?

Getting the swing right so that it doesn't look trashy is going to be difficult, but I'm sure it'll work nicely. One element I really want to have is the filter coming out and allowing the rest of the form to be removed too. So, the filter is both a lock for the device to fit and stay on the face, as well as a point of release for the inner slide as well.

Image acquired from: blogcdn.com

One element that I really want to build in is the forms used in a traditional filter, so that there is a link made to normal, everyday devices. The filter here has a rhythmic structure to it, where water is taken, which I think I could use in the form I design.

This is my most appealing concept. The device, when I start designing it, should have an even greater swing in the form than it does here. I like the idea of it being quite small, but still a feature on the face that you would notice. I reckon now I need to refine this concept some more.

Tuesday, May 21, 2013

CCDN 271: Assignment Four: Plan Your Attack!


-Introduction-
While Critical Design does have the potential to create grass root suggestions for improvement to the product market; it lacks the corporate weight to throw around to generate Massive Critical Change. For Massive Critical Change to occur in the field of economic and technological development, it must be generated and carried out by those in power and control of the market, or alternatively driven by consumer demand.

-Paragraph 1- What is Critical Design & what is it trying to achieve?
Critical Design is not a specific concept of how to generate change. Critical Design is much more of a stance. Critical Designers are attempting to disturb the waters of the everyday. That is their niche. They want to engage society with challenging issues from the ground up. They seek to challenge the very nature of what design is, as well as what its service to society should be.
Critical Designers define their own work as something that “uses speculative design proposals to challenge narrow assumptions, preconceptions and givens about the role products play in everyday life.” (Dunne & Raby, 2013)
Refer heavily to Dunne & Raby as well as Bowen.
Critical Design is a diverse stance that, overall, suggests there is a state that needs to be changed. This relates back to the fact that Critical Design serves as a group that has a stance that, while perceived as critical and un-sellable, still serves a purpose for the development of the greater status quo.

-Paragraph 2- What problems does Critical Design face?
Due to the very nature of Critical Design, it is unpopular. Therefore, as a result, the artefacts that are created cannot be sold like normal affirmative design products. Debates relating to critical design often rarely leave the elitist and relatively rarefied art galleries and institutions they are displayed in. (Yauner, 2009)
Refer to Yauner, as well as Dunne & Raby.
Critical Designs rejection of current ideologies as the only ideologies means that the ideologies currently socially “in” are ignored, and the product will not sell. As a result, Critical Design itself cannot lead the charge in an instance of Massive Critical Change. It only lays the spark that has the potential to start a flame.

-Paragraph 3- Massive Critical Change’s modern beginnings
The press release of the Sony “Walkman” was at first received with small amounts of criticism, but once physically released, it sparked a worldwide revolution in consumer electronics. However, while at the time the Walkman represented a critical change to the industry and would be considered Massive Critical Change, it was not designed by a critical designer. Yes, it was changing the status quo, but the change was instigated by a popular, valuable, and affirmatively designing corporation. Critical Designers rarely have the corporate weight to throw around to generate Massive Critical Change, as this sort of power rests with the large companies.
Refer heavily to Mau, Yauner, as well as Barab.
The release of a game-changing affirmative product often causes Massive Critical Change nowadays, and usually carries far more weight in the market than a critical design, where the audience can often be limited.

-Paragraph 4- Tough decisions with big repercussions
Massive Critical Change however still very much has the potential to be sparked by critical designers. This is especially true in the field of environmental and social concerns, where there is almost always a large amount of consistent activism taking place. Changes suggested by Critical Design and carried out by affirmative corporations can have massive impact on the market, as well as global corporate policies.
Refer to Mau, Dunne & Raby, and Barab.
A small change in policy for a large corporation can result in a massive change for the industry as a whole, especially when it comes to controversial issues and unpopular decisions.

-Paragraph 5- What happens when commonplace ideologies are challenged?
The design industries themselves are being forced to change. The biggest upheaval in recent years has been the rise of 3D printing. Designers have had to relinquish the task of designing products for the consumer, as the consumer is beginning to demand more creative control over their products.
Refer to Coughlan, Klaasen & Neicu and Linn.
These changes themselves show the beginnings of Massive Critical Changes to the industry. Critical thinking is about challenging long-standing ideologies, and these changes are definitely challenging long-standing ideologies. The industry has to re-think what they can sell to people, as well as how they can provide services to their customers.

-Paragraph 6- What impact can the consumer have?
The way the design industry is changing is due to a changing method of design. Consumers are demanding control and creating things previously limited to the industry, and as a result, even the most fundamental laws of our societies are beginning to lose relevancy. The area we are heading into is largely unexplored. Companies are attempting to make headway in these areas before the consumers expect it to be the norm.
Refer to Klaasen & Neicu and Brown.
The biggest instance of Massive Critical Change to date may occur when “design is taken out of the hands of designers and put into the hands of everyone.” (Brown, 2009)

-Paragraph 7- Where does Critical Design sit currently?
If the world is so controlled by the consumers and corporations, then where does Critical Design actually fit? Critical Design has very much carved out its own niche, where it serves as a suggestive force. Critical Design isn’t incapable of generating change, but it initiates that change at a grassroots level, challenging the ideologies of the corporations and society, so as to raise awareness.
Refer to Dunne & Raby, Fabrica, as well as Linn.
At its core, Critical Design is a form of activism that, depending on the designer, can have a variety of targets and goals.

-Conclusion-
Massive Critical Change is not something that just springs out of nothing. Due to the nature of Critical Design and how it tends to operate, it can suffer from some serious pitfalls, but at the same time, it has the potential to have tangible influence on the generation of Massive Critical Change. It can be the spark that can start the fire.
However, that said, there is no fire without wind, and that wind is the companies and corporations with the money and power to influence the product market on a global scale. The socio-political weight they bring to the market allow the decisions they make to be well respected and often followed. Leading by example in the marketplace is one of the most powerful tools to bring about Massive Critical Change.
There is also one final option. The flame is picked up by the people. The flame is nurtured and spread through the public, gaining momentum through popularity. People have the power to make change happen, but only if the change is popular enough.
Massive Critical Change is no random event. Regardless of the initiation, the effect on the world can be truly massive.

-Bibliography-
Barab, S. A., Thomas, M. K., Dodge, T., Squire, K., Newell, M. (2004). Critical Design Ethnography: Designing for Change. Anthropology & Education Quarterly, 35(2), 254-268. doi: 10.1525/aeq.2004.35.2.254
BOWEN, S. J. (2007). Crazy ideas or creative probes?: presenting critical artefacts to stakeholders to develop innovative product ideas. In: Proceedings of EAD07: Dancing with Disorder: Design, Discourse and Disaster, Izmir, Turkey, 11-13 April 2007
Brown, T. (2009, July). Tim Brown Urges Designers To Think Big [Video File]. Retrieved from http://www.ted.com/talks/tim_brown_urges_designers_to_think_big.html
Coughlan, P. (2010). How Might Design Catalyse Massive (Positive) Change? The Journal of Corporate Citizenship, (37), 34-36. Retrieved from http://search.proquest.com/docview/497142247?accountid=14782
Fabrica. (2013). About Fabrica. Retrieved May 17, 2013, from http://www.fabrica.it/about
Klaassen, R., & Neicu, M. (2011). CTRL–Alt–Design. In Proceedings of the Design History Society Annual Conference Design Activism and Social Change.
Linn, R. & Hayman, J. (n.d.). Can Businesses Actually Make The World Better While Making Money?. Co.Exist. Retrieved from http://www.fastcoexist.com/
Mau, B. & Institute without Boundaries. (2004). Massive Change. London, U.K.: Phaidon Press.
Melles, G. & Feast, L. (2013). Design Thinking and Critical Approaches: The Pragmatist Compromise.

Yauner, F. (2009). Can Critical Design Create a Debate, if it just keeps Talking to Itself?. Retrieved from http://www.northumbria.ac.uk/

INDN 211: Completed Set!

It's almost there! The project is nearing completion, and I am slowly filling the box to its brim with finished goodies. The grips are all stained and varnished, the box is painted, and the holding section is working well at holding the different pieces in place.


The pieces all sit in there rather nicely, allowing for each piece to be completely visible, while still keeping the box compact and not over-sized. The pieces all get their individual space, while at the same time keeping an order coherent.

The pieces actually work really well together! They form a coherent whole, and I feel the over sized length is quite elegant and allows the pen to balance nicely. Some of the sizes were developed mostly out of intuition, so I'm glad that they worked out nicely. The walnut looks decently aged, while still looking classy enough to be a new product.

And this is the full set! Next, and finally, we'll take a step into the photo studio, to make the piece really shine.

Sunday, May 19, 2013

INDN 211: Box & Instructions Development

The box will be a crucial element for this project, as it really ties it all together. Without the box, the pieces will all just lay around randomly. The box will provide a uniting relevance. It will also provide a medium for the explanation and instructions to sit on, allowing people to see the set as a complete, with instructions and diagrams.

The top of the box will have an illustration of the pen tool, as well as the name. You might just be able to see the pieces I'm laser cutting on these pictures, as the lines are very thing, making them hard to see on the white. I find moving my head down and looking up at the screen makes them more visible.

I went with a pretty simple interlocked box design, as this will make the box nice and stable, as well as provide enough space to have a little cross pattern to decorate the sides of the box.

After getting it laser cut, I proceeded to put it together, gluing together the different components. This was messy, and resulted in a lot of glue seeping through gaps. C-c-c-c-craft knife demolition time!

This is looking at the bottom of the box. You can see the slots poking through, as well as the side patterns attached to the box. The box is actually surprisingly stable, given that it's made of 4mm hoop pine ply. I really like the look of the pine too, and once it's varnished it should have a nice shine.

For the lid, I made two separate sections, and then glued them together. The underside of the lid provides more information about the product, as well as serving as an "opening letter" of sorts for when the consumer opens their new present. The etching is really nice and clear, and fulfills it's purpose nicely.

As a final addition, on the last post, I didn't include a look at the most up to date photos of the grips. Well here you are! The black grip against the walnut of the wood looks rather classy. And next to the pine, it looks even darker still. Very nice.

I'm so close to finishing now!!

Saturday, May 18, 2013

INDN 211: Tertiary Production Phase

Well, the plastic has been vacuum formed, and I've gotten the CNC lathed pieces of steel back. One of the first things that I needed to do was to mould these sections to the wooden grips. The reason I needed to do that was so that they'd actually fit. The pieces were vacuum formed flat, with only the raises in them, however, for them to fit on the grips, they needed to have a much more defined curve in them, a unique fit for each separate raised section.

The next thing I had to do was spray paint them black. I chose black because it would ultimately be quite close to the walnut colour the stained wood would finally get, while at the same time being different enough to make a contrast.


Wanting to have an element of uniformity, I decided to roll with the CNC lathed sections being the same black colour as the grips. This usage of only two colour sets (besides the white brush tips) will keep the contrast minimal and make sure that I have a single unified aesthetic.

I got three separate brush sizes, measured them up, cut them up, and then drilled the holes in the steel tips to fit the brushes. These brush tips I then glued into the steel points, and then I wrapped the brush elements in masking tape before spray painting everything. Once it had all dried after multiple coats of paint, I went to work on making the sections fit into the grips. This mostly just involved screwing them in and out of the grips multiple times, as as to wear them in a bit.

Looking lovely! I then gave the same treatment to the discs and the weights. Original plan was to put some white dots in little notches I drilled into the tops of my weights, but I actually think I'll leave that part out, as it doesn't really add that much, and it is another colour element that I don't need.

Meanwhile, in stain-land amidst brown and sticky fingers and messy paint brushes, I'm reaching the point of completion. Two base layers of the Sikkers HLS, followed by two top coats of the Filter 7, and the grips are looking decently dark, while still retaining the beautiful grain.

Following that, I then attached the grips to the first two and the discs to all five of them, which was a mission in itself. Then I followed up all the stain with a top coat of varnish, to give the pieces a consistent semi-shiny satin finish. Looking good!

INDN 252: A Spark!

While I was lying in bed last night, an idea came to me. One that I feel might work well for this project. The idea that I had was that there could be a device on people, part of their anatomy, that would allow them to siphon the water out of the air, allowing us to always stay hydrated.

This could be inspired by actual water filtering systems, as well as biological multi-layered systems such as plant leaf structure or other such growths.

The location of the device is something that could essentially be decided quite arbitrarily, but I feel that having the device on the face allows it to almost be something that could become jewellery, making it a prominent feature for the person to play with and customise. The form could therefore be something very important.

I'm going to make a big assumption here and say that the time that this anatomy rises would be some time around the 22nd century. Possibly, the earth's water supplies have all but dwindled, and the only way to get water as an average person is through the air, as this is always being replenished. The form therefore would follow a very futuristic form and series of shapes. Food for thought.

The form itself wouldn't be able to to just be ANY form however, as there would have to be certain elements that always have to be present to allow the item to work. There have to be air intakes, as well as vents for the air to leave again. The form could be extremely function-following, but at the same time, there could still be potential for aesthetic enhancement.

Image acquired from www.konia.com

The water filtration system would have to be multi phase. One of the really cool parts of the system could be that it would completely come off the body, allowing for cleaning of the water filter, making it something that people have to take care of, as if it were there own body, because it is. There could be a removable final filter, allowing the user to just clean that section regularly, not taking the who piece off unless they wanted to.